

Để thiết kế UI trong Android cần biết cách sắp xếp (layout) các phần tử view. Trong Android có hỗ trợ 1 số ViewGroup để layout các phần tử view theo những cách khác nhau.
Khái niệm View
Những gì nhìn thấy trên màn hình thiết bị Android như Button, EditText, ImageView, TextView, RadioButton, CheckBox, ListView, GridView... được gọi là View. Mỗi View có những chức năng khác nhau.
Ví dụ:
TextView: view dùng hiện thị text lên màn hình.EditText: view dùng lấy nội dung mà người dùng nhập vào.ImageView: view dùng hiển thị hình ảnh.Button: view dùng để thực hiện 1 nhiệm vụ khi nhấn vào button.
Trong Android, class View được định nghĩa trong package: package android.view;
Có thể tạo view mới bằng cách extends từ lớp View và override lại các phương thức của View để làm việc với View mới.
Một số thuộc tính của View
layout_height
Thuộc tính quy định chiều cao của view và có các giá trị:
match_parent: chiều cao của view bằng đúng chiều cao của phần tử cha chứa nó.wrap_content: chiều cao của view phụ thuộc vào content của view.giá trị xác định: xác định chiều cao của view theo 1 đơn vị (dp,px,in,mm,sp...)
layout_width
Thuộc tính quy định chiều rộng của view và có các giá trị:
match_width: chiều rộng của view bằng đúng chiều rộng của phần tử cha chứa nó.wrap_content: chiều rộng của view phụ thuộc vào content của view.giá trị xác định: xác định chiều rộng của view theo 1 đơn vị (dp,px,in,mm,sp...)
Khái niệm ViewGroup
ViewGroup là 1 view chứa những view khác. ViewGroup có nhiệm vụ tính toán và sắp xếp (layout) các phần tử view con nằm bên trong nó theo quy luật nào đó.
Nếu muốn tạo ra ViewGroup mới để layout các view con trong nó sắp xếp tuỳ ý thì có thể extends từ lớp ViewGroup và override lại 2 phương thức là onLayout và onMeasure.
Có khá nhiều ViewGroup được sử dụng trong Android như FrameLayout, RelativeLayout, LinearLayout, TableLayout, CoordinateLayout... Nhưng phổ biến nhất là 3 ViewGroup sau:
- FrameLayout
- RelativeLayout
- LinearLayout
FrameLayout
FrameLayout là ViewGroup được sử dụng nhiều trong Android bởi vì đơn giản và thời gian tính toán để layout ra các view con trong nó là thấp nhất nên performance của ViewGroup này là cao nhất.
FrameLayout được định nghĩa bắt đầu bởi thẻ <FrameLayout> và thẻ đóng </FrameLayout>. Ở giữa thẻ đóng và thẻ mở chính là các view con của nó.
<?xml version="1.0" encoding="utf-8"?>
<FrameLayout xmlns:Android="http://schemas.Android.com/apk/res/Android"
    Android:layout_width="match_parent"
    Android:layout_height="match_parent">

    <!--View Child-->
</FrameLayout>
Quy tắc layout
Quy tắc layout các view con trong FrameLayout là các view nằm chồng lên nhau, view thêm vào sau nằm đè lên view nằm phía dưới. Ví dụ:
<?xml version="1.0" encoding="utf-8"?>
<FrameLayout xmlns:Android="http://schemas.Android.com/apk/res/Android"
    Android:layout_width="match_parent"
    Android:layout_height="match_parent">
    <TextView
        Android:layout_width="wrap_content"
        Android:layout_height="wrap_content"
        Android:text="Hello World"
        Android:textColor="#2c3e50"
        Android:textSize="32sp" />

    <TextView
        Android:layout_width="wrap_content"
        Android:layout_height="wrap_content"
        Android:text="STDIO"
        Android:textColor="#16a085"
        Android:textSize="32sp" />
</FrameLayout>
Với đoạn mã trên thì "STDIO" nằm chồng lên "Hello World":

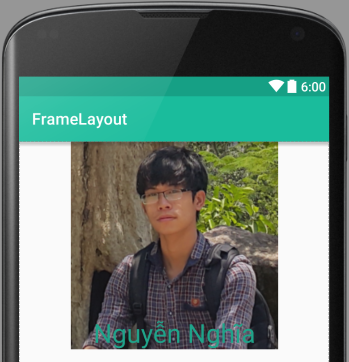
Ví dụ cần 1 tấm hình và muốn hiện chữ lên trên tấm hình đó thì cần FrameLayout.
<?xml version="1.0" encoding="utf-8"?>
<FrameLayout xmlns:Android="http://schemas.Android.com/apk/res/Android"
    Android:layout_width="match_parent"
    Android:layout_height="match_parent">

    <FrameLayout
        Android:layout_width="match_parent"
        Android:layout_height="wrap_content">
        <ImageView
            Android:layout_width="match_parent"
            Android:layout_height="wrap_content"
            Android:src="@drawable/avatar_author"/>

        <TextView
            Android:layout_gravity="bottom|center"
            Android:layout_width="wrap_content"
            Android:layout_height="wrap_content"
            Android:text="Nguyễn Nghĩa"
            Android:textColor="#16a085"
            Android:textSize="32sp" />
    </FrameLayout>

</FrameLayout>
Tên tác giả nằm đè lên trên hình ảnh.
Ưu điểm
Là ViewGroup đơn giản nên thời gian tính toán để layout các view con nhanh.
Nhược điểm
Không thiết kế được cái giao diện phức tạp.
RelativeLayout
RelativeLayout được định nghĩa trong xml bởi cặp thẻ đóng mở <RelativeLayout> và thẻ đóng </RelativeLayout>.
<?xml version="1.0" encoding="utf-8"?>
<RelativeLayout xmlns:Android="http://schemas.Android.com/apk/res/Android"
    Android:layout_width="match_parent"
    Android:layout_height="match_parent">

    <!--View child-->
</RelativeLayout>
Quy tắc layout
Quy tắc layout của RelativeLayout khá giống như FrameLayout, nhưng có 1 số điểm đặc biệt là các view có thể xác định bằng vị trí tương đối (relative) với các view khác thông qua id.
Các vị trí tương đối này như sau:
android:layout_above="id_name": view hiện tại nằm phía trên view có thuộc tính id làid_name.android:layout_below="id_name": view hiện tại nằm phía dưới view có thuộc tính id làid_name.android:layout_toLeftOf="id_name": view hiện tại nằm bên trái dưới view có thuộc tính id làid_name.android:layout_toRightOf="id_name": view hiện tại nằm phía bên phải view có thuộc tính id làid_name.
Xét ví dụ để hiểu thêm về RelativeLayout.
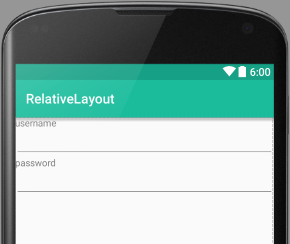
EditText usernamenằm dướiTextView username.TextView passwordnằm dướiEditext username.EditText passwordnằm dướiTextView password.
Mã nguồn như sau:
<?xml version="1.0" encoding="utf-8"?>
<RelativeLayout xmlns:Android="http://schemas.Android.com/apk/res/Android"
    Android:layout_width="match_parent"
    Android:layout_height="match_parent">

    <TextView
        Android:id="@+id/tv_username"
        Android:layout_width="wrap_content"
        Android:layout_height="wrap_content"
        Android:text="username" />

    <EditText
        Android:id="@+id/edt_username"
        Android:layout_width="match_parent"
        Android:layout_height="wrap_content"
        Android:layout_below="@+id/tv_username" />

    <TextView
        Android:id="@+id/tv_password"
        Android:layout_width="wrap_content"
        Android:layout_height="wrap_content"
        Android:layout_below="@id/edt_username"
        Android:text="password" />

    <EditText
        Android:id="@+id/edt_password"
        Android:layout_width="match_parent"
        Android:layout_height="wrap_content"
        Android:layout_below="@id/tv_password"
        Android:inputType="textPassword" />

</RelativeLayout>
Xét tiếp ví dụ như hình sau:
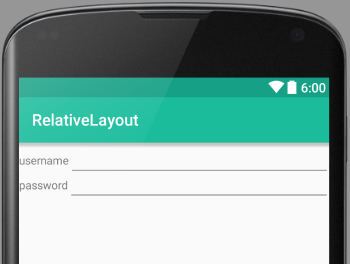
EditText usernamenằm bên phảiTextView username.EditText passwordnằm bên phảiTextView password.TextView passwordvàEditText passwordnằm phía dướiTextView username.
<?xml version="1.0" encoding="utf-8"?>
<RelativeLayout xmlns:Android="http://schemas.Android.com/apk/res/Android"
    Android:layout_width="match_parent"
    Android:layout_height="match_parent">

    <TextView
        Android:id="@+id/tv_username"
        Android:layout_width="wrap_content"
        Android:layout_height="wrap_content"
        Android:layout_alignBaseline="@+id/edt_username"
        Android:text="username" />

    <EditText
        Android:id="@+id/edt_username"
        Android:layout_width="match_parent"
        Android:layout_height="wrap_content"
        Android:layout_toRightOf="@+id/tv_username" />

    <TextView
        Android:id="@+id/tv_password"
        Android:layout_width="wrap_content"
        Android:layout_height="wrap_content"
        Android:layout_alignBaseline="@id/edt_password"
        Android:layout_below="@id/edt_username"
        Android:text="password" />

    <EditText
        Android:id="@+id/edt_password"
        Android:layout_width="match_parent"
        Android:layout_height="wrap_content"
        Android:layout_below="@id/tv_username"
        Android:layout_toRightOf="@id/tv_password"
        Android:inputType="textPassword" />

</RelativeLayout>
1 số thuộc tính khác thường xuyên sử dụng với RelativeLayout:
android:layout_alignParentBottom="boolean": căn dưới phần tử hiện theo phần tử cha nếu set làtrue.android:layout_alignParentTop="boolean": căn trên phần hiện tại theo phần tử cha nết set làtrue.android:layout_alignParentRight="boolean": căn phải phần tử hiện tại theo phần tử cha nếu set làtrue.android:layout_alignParentLeft="boolean":căn trái phần tử hiện tại theo phần tử cha nếu set làtrue.
Ví dụ:
<?xml version="1.0" encoding="utf-8"?>
<RelativeLayout xmlns:Android="http://schemas.Android.com/apk/res/Android"
Android:layout_width="match_parent"
Android:layout_height="match_parent">
<View
Android:background="#2c8291"
Android:layout_width="200dp"
Android:layout_height="200dp"/>
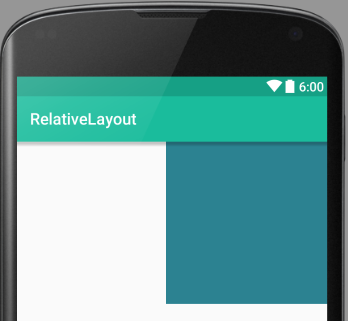
</RelativeLayout>Thử thêm các thuộc tính trên để xem kết quả như thế nào. Giả sử thêm như sau:
<?xml version="1.0" encoding="utf-8"?>
<RelativeLayout xmlns:Android="http://schemas.Android.com/apk/res/Android"
    Android:layout_width="match_parent"
    Android:layout_height="match_parent">

    <View
        Android:layout_alignParentRight="true"
        Android:background="#2c8291"
        Android:layout_width="200dp"
        Android:layout_height="200dp"/>

</RelativeLayout>
Và kết quả view được căn phải.
Ưu điểm
- Thiết kế được các giao diện phức tạp.
Nhược điểm
- Thời gian tính toán và layout các view con khá lâu so với FrameLayout.
- Muốn sử dụng các thuộc tính như
android:layout_above,android:layout_toLeftOfthì phải đặtidcho các view mà view hiện tại xác định vị trí tương đối đối với các view đó.
LinearLayout
LinearLayout là ViewGroup được sử dụng khá phổ biến cùng FrameLayout và RelativeLayout, LinearLayout được định nghĩa trong xml bởi cặp thẻ đóng mở <LinearLayout> và thẻ đóng </LinearLayout>.
<?xml version="1.0" encoding="utf-8"?>
<LinearLayout xmlns:Android="http://schemas.Android.com/apk/res/Android"
    Android:layout_width="match_parent"
    Android:layout_height="match_parent">

   <!--View child-->
</LinearLayout>
Điểm đặc biệt của LinearLayout là có thể chia layout theo các tỉ lệ khác nhau.
Quy tắc layout
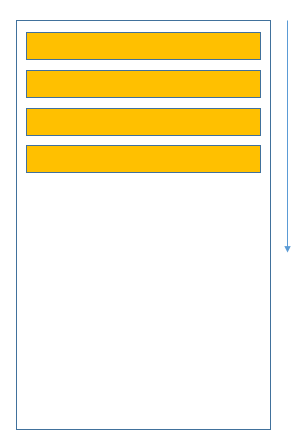
LinearLayout sắp xếp các view con theo 2 hướng:
- Vertical: Sắp xếp view con theo chiều dọc. Các view được thêm vào sau được sắp xếp theo hướng mũi tên từ trên xuống và không có view nào nằm đè lên view nào.
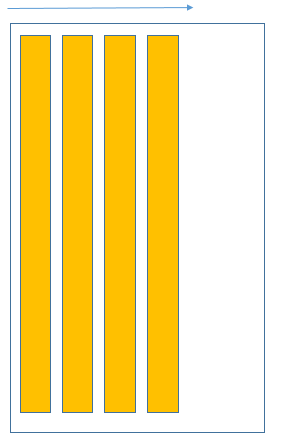
- Horizontal: Sắp xếp các view con theo chiều ngang. Các view được thêm vào sau được sắp xếp theo hướng mũi tên từ trái qua phải và không có view nào nằm đè lên view nào.
Để xác định hướng mà LinearLayout layout các phần tử con theo vertical hay horizontal, sử dụng thuộc tính sau:
- Vertical:
android:orientation="vertical" - Horizontal:
android:orientation="horizontal"
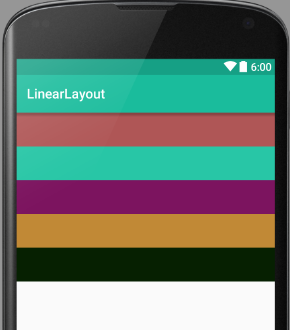
Ví dụ với đoạn mã:
<?xml version="1.0" encoding="utf-8"?>
<LinearLayout xmlns:Android="http://schemas.Android.com/apk/res/Android"
    Android:layout_width="match_parent"
    Android:layout_height="match_parent"
    Android:orientation="vertical">

    <View
        Android:background="#af5656"
        Android:layout_width="match_parent"
        Android:layout_height="50dp" />

    <View
        Android:background="#28c6a6"
        Android:layout_width="match_parent"
        Android:layout_height="50dp" />
    <View
        Android:background="#7c145f"
        Android:layout_width="match_parent"
        Android:layout_height="50dp" />
    <View
        Android:background="#c18936"
        Android:layout_width="match_parent"
        Android:layout_height="50dp" />
    <View
        Android:background="#062001"
        Android:layout_width="match_parent"
        Android:layout_height="50dp" />

</LinearLayout>
Giao diện:
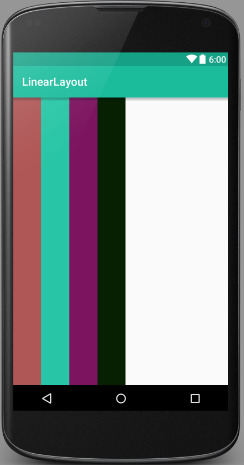
Với đoạn mã tiếp theo thay đổi orientation thành horizontal:
<?xml version="1.0" encoding="utf-8"?>
<LinearLayout xmlns:Android="http://schemas.Android.com/apk/res/Android"
    Android:layout_width="match_parent"
    Android:layout_height="match_parent"
    Android:orientation="horizontal">

    <View
        Android:background="#af5656"
        Android:layout_width="50dp"
        Android:layout_height="match_parent" />

    <View
        Android:background="#28c6a6"
        Android:layout_width="50dp"
        Android:layout_height="match_parent" />
    <View
        Android:background="#7c145f"
        Android:layout_width="50dp"
        Android:layout_height="match_parent" />
    <View
        Android:background="#062001"
        Android:layout_width="50dp"
        Android:layout_height="match_parent" />

</LinearLayout>
Kết quả như dưới đây:
Ví dụ thiết kế giao diện đăng nhập:
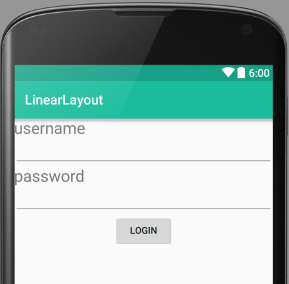
Thiết kế bằng xml với LinearLayout:
<?xml version="1.0" encoding="utf-8"?>
<LinearLayout xmlns:Android="http://schemas.Android.com/apk/res/Android"
    Android:layout_width="match_parent"
    Android:layout_height="match_parent"
    Android:orientation="vertical">


    <TextView
        Android:text="username"
        Android:layout_width="match_parent"
        Android:layout_height="wrap_content"
        Android:textSize="24sp"/>

    <EditText
        Android:layout_width="match_parent"
        Android:layout_height="wrap_content" />

    <TextView
        Android:text="password"
        Android:layout_width="match_parent"
        Android:layout_height="wrap_content"
        Android:textSize="24sp"/>

    <EditText
        Android:inputType="textPassword"
        Android:layout_width="match_parent"
        Android:layout_height="wrap_content" />

    <Button
        Android:text="login"
        Android:layout_gravity="center_horizontal"
        Android:layout_width="wrap_content"
        Android:layout_height="wrap_content" />


</LinearLayout>
Chia tỉ lệ layout
Ngoài cách sử dụng LinearLayout thông thường thì LinearLayout thường được sử dụng để phân chia tỉ lệ layout bằng cách sử dụng thuộc tính layout_weight và weightSum.
weightSum: xác định trọng số của LinearLayout hiện tại.layout_weight: trọng số mà view con trong LinearLayout chiếm giữ.
Chia tỉ lệ không có weightSum
<?xml version="1.0" encoding="utf-8"?>
<LinearLayout xmlns:Android="http://schemas.Android.com/apk/res/Android"
Android:layout_width="match_parent"
Android:layout_height="match_parent"
Android:orientation="horizontal">
<View
Android:layout_width="0dp"
Android:layout_height="match_parent"
Android:layout_weight="1"
Android:background="#af5656" />
<View
Android:layout_width="0dp"
Android:layout_height="match_parent"
Android:layout_weight="4"
Android:background="#28c6a6" />
<View
Android:layout_width="0dp"
Android:layout_height="match_parent"
Android:layout_weight="2"
Android:background="#7c145f" />
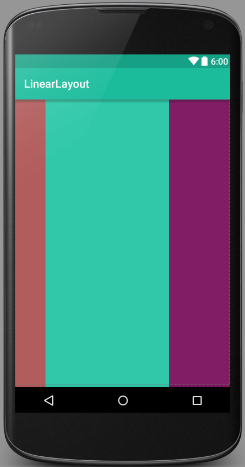
</LinearLayout>Không đánh trọng số weightSum cho LinearLayout nên tổng trọng số của nó được tính bằng tổng trọng số (layout_weight) các view con cộng lại.
Ở đây weightSum = 1 + 4 + 2 = 7. Có nghĩa là LinearLayout này chia thành 7 phần:
- View thứ nhất có
android:layout_weight="1"chiếm 1/7. - View thứ hai có
android:layout_weight="4"chiếm 4/7. - View thứ ba có
android:layout_weight="2"chiếm 2/7.
Kết quả:
Nếu orientation là vertical.
<?xml version="1.0" encoding="utf-8"?>
<LinearLayout xmlns:Android="http://schemas.Android.com/apk/res/Android"
    Android:layout_width="match_parent"
    Android:layout_height="match_parent"
    Android:orientation="vertical">

    <View
        Android:layout_width="match_parent"
        Android:layout_height="0dp"
        Android:layout_weight="1"
        Android:background="#af5656" />

    <View
        Android:layout_width="match_parent"
        Android:layout_height="0dp"
        Android:layout_weight="4"
        Android:background="#28c6a6" />

    <View
        Android:layout_width="match_parent"
        Android:layout_height="0dp"
        Android:layout_weight="2"
        Android:background="#7c145f" />
</LinearLayout>
Kết quả
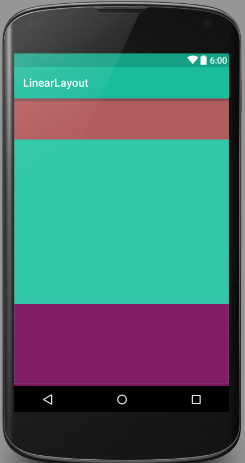
Chia tỉ lệ có weightSum
Khác với cách trên weightSum được tính toán bằng tổng của cách layout_weight của các view con. Có thể xác định giá trị weightSum cụ thể như sau:
<?xml version="1.0" encoding="utf-8"?>
<LinearLayout xmlns:Android="http://schemas.Android.com/apk/res/Android"
    Android:layout_width="match_parent"
    Android:layout_height="match_parent"
    Android:weightSum="10"
    Android:orientation="vertical">

    <View
        Android:layout_width="match_parent"
        Android:layout_height="0dp"
        Android:layout_weight="5"
        Android:background="#af5656" />

    <View
        Android:layout_width="match_parent"
        Android:layout_height="0dp"
        Android:layout_weight="2"
        Android:background="#28c6a6" />

    <View
        Android:layout_width="match_parent"
        Android:layout_height="0dp"
        Android:layout_weight="1"
        Android:background="#7c145f" />
</LinearLayout>
Xác định weightSum có giá trị là 10, có nghĩa là chia layout này thành 10 phần.
- View thứ nhất chiếm 5/10.
- View thứ hai chiếm 2/10.
- View thứ ba chiếm 1/10.
- Còn lại 2/10 là khoảng trắng.
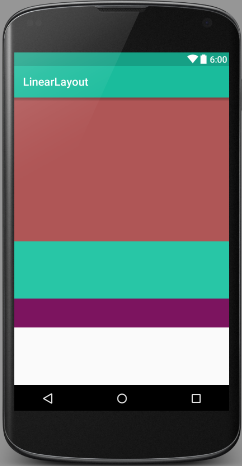
Điểm khác biệt của 2 cách chia tỉ lệ này là chia tỉ lệ không có weightSum thì các view trong LinearLayout "phủ" đầy layout này (không có khoảng trống). Còn với cách chia tỉ lệ có weightSum có thể sinh ra khoảng trống như ví dụ ở trên.
Ưu điểm
- Thiết kế được các giao diện phức tạp.
- Chia tỉ lệ layout, phù hợp với việc phát triển UI trên nhiều thiết bị có kích thước màn hình khác nhau.
Nhược điểm
- Thời gian tính toán và layout view con tốn chi phí hơn so với FrameLayout và RelativeLayout. Đây là ViewGroup tính toán phức tạp nhất trong bộ 3 ViewGroup thường xuyên được sử dụng (FrameLayout, RelativeLayout, LinearLayout).